Tampilkan postingan dengan label Breads. Tampilkan semua postingan

Cronuts! Part 2: The Sights and Sounds

As promised, here’s the finale to our two-part cronut extravaganza! The series concludes with me frying the two batches – the first half fried as prepared in the last video, but the second half of the dough received an additional tri-fold, which resulted in a much higher, but less crispy cronuts.

Both were very good, and the second batch was more impressive looking, but I’m thinking that for a true croissant/doughnut hybrid, thinner and with less layers may be the way to go. 

Of course, if you’re going to fill yours with vanilla custard, as is the custom in NYC, then the taller, airier cronut is probably a better delivery system. Rest assured, further exploration is inevitable.

In case you’re wondering, the second half of the dough was frozen overnight, and then thawed in the fridge until soft enough to work with, so it seems as though making and freezing this would not be problem. I hope you give this a try soon. Enjoy!

Note: These cronuts were fried in grapeseed oil, at 350 degrees F. for about 1 1/2 to 2 minutes per side. Click here to watch Part 1.

Cronuts! The Doughnuts That Make People Go Nuts! Part 1: The Dough

I’m assuming that since you’re on a food blog you've probably heard about “cronuts,” but just in case, here’s a quick review. 

This croissant/doughnut hybrid was invented by Dominique Ansel at the Dominique Ansel Bakery in New York City. It became an overnight sensation, and now people stand in line for hours just for a chance at getting one of the precious few that are made each day.

Why all the hype? Very simple – it has the shape and flavor of a doughnut, yet features the crispy, flaky texture of a buttery croissant. What’s not to hype? Anyway, after seeing like two dozen new reports on the craze, and receiving a scary number of food wishes for it, I decided to give it a go, if for no other reason than to save a few of my NYC friends the humiliation of being Instagrammed standing in that line.

Since I’ve never tasted a cronut, what follows is purely an educated guess, but I think I got pretty close. Maybe one of you New Yorkers will mail me one, so I know for sure? My game plan was simple. Make a slightly sweet, yeasty, doughnut-esque dough, which I’d then layer with butter, using the classic croissant technique.

It’s a procedure I do all the time, as in once, back in culinary school, thirty years ago. So, instead of going by the book, or even looking in a book, I winged it, and not only that, I streamlined things too. Instead painstakingly pounding out perfectly sized slabs of cold butter, I decided to try simply spreading softened butter instead. I also threw caution to the wind, and pulled off the rare and terrifying “double fold and turn,” and lived to tell the tale.

Like I said in the video, we’ll cover the final results in Part 2, but spoiler alert…these were awesome. I did two different versions, one regular, and one with an extra “fold and turn” which resulted in a taller, and even more impressive cronut. Stay tuned!


Ingredients for 16 Cronuts:
1 package dry active yeast (2 1/4 tsp)
1/2 cup warm water (105 degrees F.)
1 teaspoon fine salt
2 rounded tablespoons white sugar (add an extra if you want a sweeter 'nut)
1/2 cup milk
2 tablespoons melted butter
1 teaspoon of vanilla extract
1 large egg
1/8 teaspoon ground nutmeg
1 pound all-purpose flour, more as needed
6 ounces soft, unsalted, "European-style" butter (12 tablespoons)

Fist steps:
- Combine yeast and warm water, and let sit five minutes.
- Add the rest of the ingredients, except for the flour and the European-style butter, and whisk to combine.
- Add the flour, and knead for about three minutes or until a soft sticky dough ball forms.
- Wrap dough in plastic, and refrigerate for 20 minutes.
- Roll dough out into roughly a 18 x 9-inch rectangle.
- Proceed with butter as shown!

Holiday Pumpkin Bread in Theory and Practice

Holiday Pumpkin Bread in Theory and PracticeI could have just Googled a pumpkin bread recipe. I'm sure there are hundreds of excellent ones, tested and retested, right there for the taking. But I didn't, because I had something better, a theory. Theoretically speaking, there is nothing better than a good theory.

My theory was that if I took my banana bread recipe, which is one of my absolute favorites, and used pumpkin puree in place of the mashed, ripe bananas, I would have an equally impressive loaf.

So, what were the results of this grand pumpkin bread experiment? A very decent loaf of quick bread, which would make a handsome addition to any holiday dessert table! Having said that, next time I make it, I will be tweaking some things.

This was very good, but didn't have the I-can't-stop-eating-this-ness of the banana bread recipe. Considering the obvious fact that bananas and pumpkins are not the same thing, I will adjust the sweetness and fat content a bit to compensate.

Anyway, stay tuned for future updates, and if you happen to make any variations on this, I'd love to hear about it! Thanks, and enjoy!


Pumpkin Bread Recipe Ingredients:
1 stick (1/2 cup) unsalted butter, soft
1 cup sugar
2 eggs
1 (15-oz) can pumpkin puree
1/2 teaspoon cinnamon
1/8 teaspoon Chinese 5-Spice
1/8 teaspoon allspice
Mixed in a bowl:
2 cups all-purpose flour
1 teaspoon table salt
1 teaspoon baking powder
1 teaspoon baking soda
3/4 cup chopped roasted walnuts
Bake at 325 degrees F. for about 1 hour

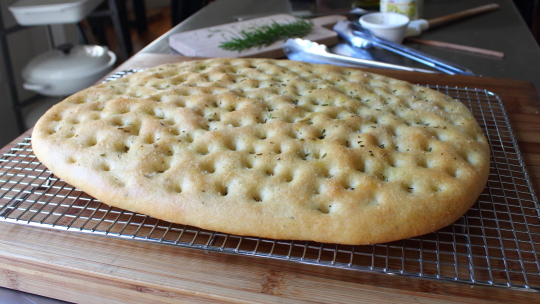
Focaccia – Surprisingly, Not Italian for “Fingers”

Some younger foodwishers may not realize this, but there was a time, before the Internet, when not everyone knew everything about everything. These days, if you’re wondering what “focaccia” means, you Google it, and all is revealed. In case you’re wondering, it comes from the Latin word for “hearth,” but that’s not what pre-Wikipedia Chef John thought.

Nope, I figured focaccia meant, “fingers.” Since the signature characteristic of the bread is the deeply dimpled surface, and those holes are created using well-oiled fingers, it made perfect sense. Plus, fingers starts with an “f,” as does focaccia, which reinforced my brilliant theory. Anyway, now we know.

This is such a fun and versatile bread to make. I went with a simple, but classic rosemary and sea salt topping, but a web search for focaccia will turn up more than just the definition. You'll see dozens of different and delicious toppings with which to accessorize your slab.

A few of my favorites would be chopped olives, caramelized onions, and sliced grapes. You can add pretty much anything to the top when you do the old finger poke, and proceed as demonstrated. Of course, depending on your garnishes, you may have to cook it a little longer, but I’m sure you’ll figure that out. No matter how you customize it, I hope you give this classic flat bread a try soon. Enjoy!


Ingredients for 6 large portions:

– Combine:
1 package (.25 oz) active dry yeast
1 cup warm water (105 F.)
2 tbsp extra virgin olive oil
3/4 tsp salt
1/4 cup semolina flour
2 tsp minced fresh rosemary
2 3/4 cups *bread flour (don’t mix in all the flour in this step; reserve about 1/4 cup for the kneading)
*As with all dough recipes, you may need a little less or little more flour. The total weight I added was about 12 oz.
*This will work with just all-purpose flour, but I prefer the bread flour and semolina

– Mix in bowl until a sticky dough forms, then knead with reserved flour and 2 additional tablespoons of olive oil, for about 7-8 minutes, until you have a smooth, elastic, but slightly sticky dough.

– Let rise until doubled, flatten on oiled pan, let rest 15 minutes, drizzle with olive oil, poke dough with finger tips, let rise 45 minutes or until doubled, brush lightly with olive oil, top with more rosemary and sea salt.

– Bake at 475 degrees F. for 14-15 minutes

Homemade Hamburger Buns – Oh, My, God. Becky, Look at Her Bun!

Finding high-quality hamburger meat at the market is a lot easier than it used to be, but the same cannot be said for the buns. They’re never the right dimensions for a decent sized patty; and they’re either made from some insipid white sponge with seventy-three ingredients, or from high-fiber, whole grains, which in many ways is even worse.

A proper bun should be nothing more than a light, buttery, airy delivery system for getting a hot, juicy hamburger into your mouth. Oats, spelt, and flax seeds have no business getting anywhere near this type of operation. That's what turkey sandwiches are for.

Above and beyond taste and texture, the bun needs to be the right diameter to fit a classic half-pound burger, and should be twice as thick as the patty. I guess you could drive all over town looking for these magic buns, but it would be a lot easier just to make them yourself.

They do take few hours, but most of that is rise time, and when you see and taste the results, I’m sure you’ll agree it was well worth the investment. By the way, don’t worry if your buns are slightly irregular in size. We’ll assume you’ll form your burgers with the same precision, so in the end they should match perfectly. I hope you give these a try soon. Enjoy! 

Editorial Note: Today’s title will only make sense if you watch the video, and are familiar with Sir Mix-A-Lot’s "Baby Got Back."


Ingredients for 8 large hamburger buns:
1 package (2 1/2 tsp) dry active yeast (I used Fleischmann's “RapidRise” Yeast)
1 cup very warm water
1 large egg
3 tablespoons butter
3 tablespoons sugar
1 1/4 teaspoons salt
1 pound all-purpose flour (about 3 1/2 cups)
Note: add a 1/2 cup of the flour to the yeast and water, and then the remainder before kneading
 
for the tops:
1 egg beaten with 1 tbsp milk
sesame seeds
*bake at 375 degrees F. for 15-17 minutes

View the complete recipe

Pita Bread – What’s in Your Pocket?

There are many baked products that you could make at home, but because of time, effort, and quality issues, probably shouldn’t. Fortunately, pita bread is not on that list. The dough is easy to make, and much like the flour tortillas we did, the taste and texture of the freshly made product is far superior to anything that comes with a twist tie.

The method is very straightforward, but I wanted to take a moment to talk about production. As you’ll see in the clip, after you roll the pita dough out, you’ll need to let it rest for 5 minutes before grilling. Since each one takes about 5-6 minutes in the pan, while one is cooking, you’ll want to roll the next, so it’s rested and ready to puff.

Speaking of “puff,” don’t be too upset if yours don’t go full balloon. Sometimes they all puff, sometimes some, and sometimes none. This is the way of the pita. But the good news is, even if they don’t fully puff, you should still get some sort of internal pocket with which to stuff. Even if you don’t, it’s okay…you’ll just call them “flatbread” instead! I hope you give these a try soon. Enjoy!


Ingredients for 8 pita breads:
For the sponge mix:
1 pkg dry active yeast (2 1/4 tsp)
1 cup warm water (about 90-100 degrees F.)
1 cup (4.5 oz by weight) all-purpose flour
Then:
1 1/2 tablespoons olive oil
1 3/4 teaspoons salt
1 3/4 to 2 cups all-purpose flour, or until a soft, slightly sticky dough forms (about 8-9 oz by weight)
*Let rise about 2 hours, or until doubled in size. Form 8 small, round loaves, let rise 30 minutes. Roll out and let rest 5 minutes before grilling.

View the complete recipe

Cheese Straws – These Don’t Suck

I took a few things for granted in this cheese straws video. I assumed you could tell how delicious they were as I crunched into them, which is why I never said as much. I also assumed you’d figure out how, where, and when to use them; as I failed to give my usual serving suggestions. I was so taken by the sound and texture of these cheesy sticks, that it just never occurred to me to state such obvious facts.

So, for the record, let’s make this official. These really tasted great, and that’s without any embellishments whatsoever. There are so many things that will work with this technique, including, but not limited to garlic butter, fresh herbs, crushed nuts, and/or literally any dried spice. As far as approved uses, it’d be easier to list things this wouldn’t work with.

Any soup, stew, or bowl of chili would look substantially better with some of these alongside. A few cheese straws will make that sleepy bowl of leftover pasta suddenly seems special again, and substituting them for toast at breakfast is a proven crowd-pleaser. Dipping toasted bread into a runny egg yolk is nice, but dipping with a warm, crispy cheese straw? That goes way beyond nice.

As long as you use some nice, grate-able pungent cheeses, and cook them long enough to get crisp, there’s no way these won’t be great. I hope you give them a try soon, and report back with all your brilliant adaptations. Enjoy!


Ingredients:
frozen puff pastry
about 2 tsp olive oil , or as needed
about 1/2 cup total finely grated aged cheddar and Parmigiano-Reggiano, or more as needed
salt, pepper, and cayenne to taste

Cheese Straws – These Don’t Suck

I took a few things for granted in this cheese straws video. I assumed you could tell how delicious they were as I crunched into them, which is why I never said as much. I also assumed you’d figure out how, where, and when to use them; as I failed to give my usual serving suggestions. I was so taken by the sound and texture of these cheesy sticks, that it just never occurred to me to state such obvious facts.

So, for the record, let’s make this official. These really tasted great, and that’s without any embellishments whatsoever. There are so many things that will work with this technique, including, but not limited to garlic butter, fresh herbs, crushed nuts, and/or literally any dried spice. As far as approved uses, it’d be easier to list things this wouldn’t work with.

Any soup, stew, or bowl of chili would look substantially better with some of these alongside. A few cheese straws will make that sleepy bowl of leftover pasta suddenly seems special again, and substituting them for toast at breakfast is a proven crowd-pleaser. Dipping toasted bread into a runny egg yolk is nice, but dipping with a warm, crispy cheese straw? That goes way beyond nice.

As long as you use some nice, grate-able pungent cheeses, and cook them long enough to get crisp, there’s no way these won’t be great. I hope you give them a try soon, and report back with all your brilliant adaptations. Enjoy!


Ingredients:
frozen puff pastry
about 2 tsp olive oil , or as needed
about 1/2 cup total finely grated aged cheddar and Parmigiano-Reggiano, or more as needed
salt, pepper, and cayenne to taste

Mushroom Ricotta Bruschetta – This Was Anything But Flat

Please do not take this post’s brevity for any kind of lack of enthusiasm or excitement over this very handsome mushroom and ricotta bruschetta. Time’s a little short today, as my car’s left-front tire was fatally injured last night in a brutal pothole attack.

Everyone else is fine, but I didn’t want to delay the uploading of this fine recipe until I had time to do a proper blog post. So basically, I’m phoning this one in. Of course, my biggest fear isn’t that you’ll be disappointed…it’s that you won’t notice that big a difference.

Anyway, this was super tasty, and very simple to make. I show making the ricotta bruschetta part first, but as I mention, you’ll obviously want to have your mushrooms cooking while you prepare the bases. I hope you give this delicious, and very versatile dish a try soon. Enjoy!


Ingredients for 4 Mushroom Ricotta Bruschetta
1 cup ricotta cheese
1 egg
zest of one lemon
1/2 tsp salt
black pepper to taste
red chili flakes to taste
4 thick slices of lightly toasted bread
1 tbsp olive oil
For the mushrooms:
2 tbsp butter, divided (half to sauté, half to stir in at end)
1 tbsp olive oil
16 large white mushrooms
1/4 cup green onions and/or 3-4 cloves of garlic
salt and pepper to taste
1/4 cup marsala wine
1/2 cup chicken broth
2 tsp lemon juice
2 tbsp chopped Italian parsley

View the complete recipe

Mushroom Ricotta Bruschetta – This Was Anything But Flat

Please do not take this post’s brevity for any kind of lack of enthusiasm or excitement over this very handsome mushroom and ricotta bruschetta. Time’s a little short today, as my car’s left-front tire was fatally injured last night in a brutal pothole attack.

Everyone else is fine, but I didn’t want to delay the uploading of this fine recipe until I had time to do a proper blog post. So basically, I’m phoning this one in. Of course, my biggest fear isn’t that you’ll be disappointed…it’s that you won’t notice that big a difference.

Anyway, this was super tasty, and very simple to make. I show making the ricotta bruschetta part first, but as I mention, you’ll obviously want to have your mushrooms cooking while you prepare the bases. I hope you give this delicious, and very versatile dish a try soon. Enjoy!


Ingredients for 4 Mushroom Ricotta Bruschetta
1 cup ricotta cheese
1 egg
zest of one lemon
1/2 tsp salt
black pepper to taste
red chili flakes to taste
4 thick slices of lightly toasted bread
1 tbsp olive oil
For the mushrooms:
2 tbsp butter, divided (half to sauté, half to stir in at end)
1 tbsp olive oil
16 large white mushrooms
1/4 cup green onions and/or 3-4 cloves of garlic
salt and pepper to taste
1/4 cup marsala wine
1/2 cup chicken broth
2 tsp lemon juice
2 tbsp chopped Italian parsley

Rosemary Honey “Pull Apart” Dinner Rolls - Because You Love Them...Right?

Entertaining during the holidays usually means plenty of costly, complicated, and time-consuming recipes, so absolutely no one would blame you if you simply tossed a tube of store-bought dinner rolls into the oven to save a little time and effort.

Of course the problem with that, at least for loyal followers of this blog, is that some or all of your family members will have seen this video by then, and you may get a few looks. Not that they would never question your undying love and devotion to their happiness, but hey, why take a chance?

Assuming that you have an electric mixer, besides a few minutes of cutting and balling the dough, these really aren’t that much work to make. If you don’t, and would have to knead this by hand, then let your conscience be your guide. I think I speak for your entire family when I say, we know you’ll do the right thing.

Anyway, as far as holiday dinner rolls go, these are pretty lean. You can certainly up the melted butter amount, and toss in a egg or two, but since these are generally going to be eaten with fairly rich food, I prefer a lighter approach.

Please feel free to embellish with anything else you’d like to toss in. I’ll toss out garlic, herbs, cheese, seeds, and nuts just to start the brainstorming session. I hope you come up with something amazing, and give these a try soon. Enjoy!


Ingredients for about 32-36 small dinner rolls:
1 packet (2 1/4 teaspoon) dry active yeast
1/4 cup warm water (100-110 degrees F.)
1 cup milk
4 tablespoon unsalted butter
1 or 2 tablespoon honey
1 teaspoon salt
2 tsp minced fresh rosemary leaves
about 3 cups unbleached all-purpose white flour, plus more if needed (NOTE: add about 2 1/2 cups of flour at the beginning of the mixing, and then add more in smaller increments until the dough just starts to pull away from the bowl. Remember, you can always add more, but can’t remove too much! Better a little too sticky than too stiff and dry.)
2 tbsp olive oil (to oil the dough)
egg wash (one egg beaten with a teaspoon of milk)

Rosemary Honey “Pull Apart” Dinner Rolls - Because You Love Them...Right?

Entertaining during the holidays usually means plenty of costly, complicated, and time-consuming recipes, so absolutely no one would blame you if you simply tossed a tube of store-bought dinner rolls into the oven to save a little time and effort.

Of course the problem with that, at least for loyal followers of this blog, is that some or all of your family members will have seen this video by then, and you may get a few looks. Not that they would never question your undying love and devotion to their happiness, but hey, why take a chance?

Assuming that you have an electric mixer, besides a few minutes of cutting and balling the dough, these really aren’t that much work to make. If you don’t, and would have to knead this by hand, then let your conscience be your guide. I think I speak for your entire family when I say, we know you’ll do the right thing.

Anyway, as far as holiday dinner rolls go, these are pretty lean. You can certainly up the melted butter amount, and toss in a egg or two, but since these are generally going to be eaten with fairly rich food, I prefer a lighter approach.

Please feel free to embellish with anything else you’d like to toss in. I’ll toss out garlic, herbs, cheese, seeds, and nuts just to start the brainstorming session. I hope you come up with something amazing, and give these a try soon. Enjoy!


Ingredients for about 32-36 small dinner rolls:
1 packet (2 1/4 teaspoon) dry active yeast
1/4 cup warm water (100-110 degrees F.)
1 cup milk
4 tablespoon unsalted butter
1 or 2 tablespoon honey
1 teaspoon salt
2 tsp minced fresh rosemary leaves
about 3 cups unbleached all-purpose white flour, plus more if needed (NOTE: add about 2 1/2 cups of flour at the beginning of the mixing, and then add more in smaller increments until the dough just starts to pull away from the bowl. Remember, you can always add more, but can’t remove too much! Better a little too sticky than too stiff and dry.)
2 tbsp olive oil (to oil the dough)
egg wash (one egg beaten with a teaspoon of milk)
coarse sea salt

Chicken Cordon Bleu-wich – An Old Classic Gets Open Faced

If you love chicken cordon bleu because it’s “fancy,” and you serve it primarily to impress dinner guests with your culinary skills, then this video is really not for you. However, if you love chicken cordon bleu because of its winning flavor combination of chicken, ham, and Gruyere cheese, then stick around.

Don’t get me wrong, I love the classic preparation, and will do my version one of these days, but for all that pounding, stuffing, rolling, pinning, breading, frying, and baking…I can deliver the same basic flavor and texture profile with significantly less time and effort.

By the way, while most consider this a French recipe, the word on the street is that this actually originated in Switzerland. That doesn’t really have any bearing on the recipe, but since I can’t remember ever giving the Swiss a hard time here, I thought I’d take this opportunity to ask, what’s up with those pocketknives? You really need one tool that can both kill a squirrel and puck nose hairs? Seems a little much.

Anyway, it’s been a while since I posted a sandwich video, and this, as the name would indicate, was certainly a blue ribbon winner. It made for a perfect lunch, but throw a poached egg on top, and you’ve got a stellar brunch item; or cut these up into quarters, and serve as finger food for the next big game. I hope you give these a try soon. Enjoy!


Ingredients for 4 portions:
*Note: topping can be made days ahead and baked whenever.
2 tbsp butter
1/2 cup diced smoked ham
1/2 cup diced onion
1/4 tsp dried thyme
2 tbsp flour
1/2 cup plus 1 tbsp milk
3 oz shredded gruyere cheese, divided (save a little for the top)
1 rounded tsp Dijon mustard
pinch of nutmeg
1 cup diced cooked chicken
1/4 cup diced dill pickle
cayenne, salt and pepper to taste
2 tbsp bread crumbs mixed with 1 tsp melted butter for the top

View the complete recipe

Chicken Cordon Bleu-wich – An Old Classic Gets Open Faced

If you love chicken cordon bleu because it’s “fancy,” and you serve it primarily to impress dinner guests with your culinary skills, then this video is really not for you. However, if you love chicken cordon bleu because of its winning flavor combination of chicken, ham, and Gruyere cheese, then stick around.

Don’t get me wrong, I love the classic preparation, and will do my version one of these days, but for all that pounding, stuffing, rolling, pinning, breading, frying, and baking…I can deliver the same basic flavor and texture profile with significantly less time and effort.

By the way, while most consider this a French recipe, the word on the street is that this actually originated in Switzerland. That doesn’t really have any bearing on the recipe, but since I can’t remember ever giving the Swiss a hard time here, I thought I’d take this opportunity to ask, what’s up with those pocketknives? You really need one tool that can both kill a squirrel and puck nose hairs? Seems a little much.

Anyway, it’s been a while since I posted a sandwich video, and this, as the name would indicate, was certainly a blue ribbon winner. It made for a perfect lunch, but throw a poached egg on top, and you’ve got a stellar brunch item; or cut these up into quarters, and serve as finger food for the next big game. I hope you give these a try soon. Enjoy!


Ingredients for 4 portions:
*Note: topping can be made days ahead and baked whenever.
2 tbsp butter
1/2 cup diced smoked ham
1/2 cup diced onion
1/4 tsp dried thyme
2 tbsp flour
1/2 cup plus 1 tbsp milk
3 oz shredded gruyere cheese, divided (save a little for the top)
1 rounded tsp Dijon mustard
pinch of nutmeg
1 cup diced cooked chicken
1/4 cup diced dill pickle
cayenne, salt and pepper to taste
2 tbsp bread crumbs mixed with 1 tsp melted butter for the top

Pumpkin Scones with Toasted Pine Nuts & Maple Glaze – A Recipe for the Other 10 Months

I have no intention of giving up the best job in the world anytime soon, but if I do, I’d try and get a job in the marketing department of a pumpkin puree company. 

I’m guessing that like 97% of the canned pumpkin in this country is used during the time from Halloween until Thanksgiving. So if I could figure out a way to get people to use this in recipes all year round, I’d be a total superstar in pumpkin puree marketing circles.

Imagine that. It would be…awesome? Anyway, maybe I should rethink this whole post-Foodwishes career path, but in the meantime, here’s just one example of how I would convince the public that pumpkin is great for anytime of the year. Ironically, I did this because I had leftover pumpkin from Thanksgiving, but still.

I may have covered this in the last scones post, but I’ve never been a huge fan of the scone. I’ve always considered it some sort of effeminate biscuit, but I’m starting to come around in my old age. There’s nothing like a freshly baked scone with a steaming hot cup of tea or coffee, especially one tricked out with pumpkin, toasted pine nuts, and maple glaze. I hope you give this a try soon…or anytime! Enjoy.


Ingredients for 12 Pumpkin Scones:
8 ounces by weight all-purpose flour (about 1 3/4 cups)
1/4 cup white sugar
1 tbsp baking powder
1/4 tsp baking soda
1/4 teaspoon salt
6 tablespoons unsalted butter
1/3 cup toasted pine nuts
1/2 cup pumpkin puree
1/3 cup buttermilk
additional flour as needed
1 egg beaten with a few drops of milk or water to brush scones before baking.
*Bake at 400 degrees F. for 15-20 minutes, or until golden brown

View the complete recipe

Pumpkin Scones with Toasted Pine Nuts & Maple Glaze – A Recipe for the Other 10 Months

I have no intention of giving up the best job in the world anytime soon, but if I do, I’d try and get a job in the marketing department of a pumpkin puree company. 

I’m guessing that like 97% of the canned pumpkin in this country is used during the time from Halloween until Thanksgiving. So if I could figure out a way to get people to use this in recipes all year round, I’d be a total superstar in pumpkin puree marketing circles.

Imagine that. It would be…awesome? Anyway, maybe I should rethink this whole post-Foodwishes career path, but in the meantime, here’s just one example of how I would convince the public that pumpkin is great for anytime of the year. Ironically, I did this because I had leftover pumpkin from Thanksgiving, but still.

I may have covered this in the last scones post, but I’ve never been a huge fan of the scone. I’ve always considered it some sort of effeminate biscuit, but I’m starting to come around in my old age. There’s nothing like a freshly baked scone with a steaming hot cup of tea or coffee, especially one tricked out with pumpkin, toasted pine nuts, and maple glaze. I hope you give this a try soon…or anytime! Enjoy.


Ingredients for 12 Pumpkin Scones:
8 ounces by weight all-purpose flour (about 1 3/4 cups)
1/4 cup white sugar
1 tbsp baking powder
1/4 tsp baking soda
1/4 teaspoon salt
6 tablespoons unsalted butter
1/3 cup toasted pine nuts
1/2 cup pumpkin puree
1/3 cup buttermilk
additional flour as needed
1 egg beaten with a few drops of milk or water to brush scones before baking.
*Bake at 400 degrees F. for 15-20 minutes, or until golden brown

Old-Fashioned Cracker Dressing & Stuffing – Do You Dare?

Here we go again, delving into the treacherous topic of changing up your traditional Thanksgiving side dishes. This time, it’s an old-fashioned cracker dressing vying to be that surprise, uninvited guest.

Sure some you alternative lifestylists may go for the cornbread, but generally, bread-based variations rule the day. There’s a great reason for this; they’re easy, delicious, and most importantly, very familiar. Therein lies the problem.

Why mess with past success? Your loved ones wait all year for your Thanksgiving feast, so why take the chance of disappointing them on the big day? You have the entire rest of the year to do that.

Anyway, I’m not going to try and convince you that this is a superior dressing, or that you should change your regular routine, but if you’re someone who's looking for a change of pace dressing, that’s still very familiar and comforting, this could be the one.

Of course, you can use whatever ingredients you normally add to your bread dressing, and it should work just the same. By the way, I never stuff my turkey, so if you choose to use this as a stuffing, please refer to the roughly one million Thanksgiving turkey cooking guides linked online. Enjoy!


Ingredients for 16 portions:
1 pound saltine crackers (4 sleeves)
1/2 cup butter
1 large or 2 small yellow onions, diced
3 or 4 ribs of celery, diced
1 tsp salt, or to taste
1/2 tsp freshly ground black pepper
cayenne to taste
1/2 tsp dried sage
1/2 tsp dried thyme
1/2 tsp dried rosemary
2 3/4 cups chicken or turkey broth
1/2 cup cream or milk
1 or 2 eggs
*Tip: you can cook a small nugget in a pan and taste for seasoning
Bake at 375 degrees F. for bout 45 minutes

View the complete recipe

Old-Fashioned Cracker Dressing & Stuffing – Do You Dare?

Here we go again, delving into the treacherous topic of changing up your traditional Thanksgiving side dishes. This time, it’s an old-fashioned cracker dressing vying to be that surprise, uninvited guest.

Sure some you alternative lifestylists may go for the cornbread, but generally, bread-based variations rule the day. There’s a great reason for this; they’re easy, delicious, and most importantly, very familiar. Therein lies the problem.

Why mess with past success? Your loved ones wait all year for your Thanksgiving feast, so why take the chance of disappointing them on the big day? You have the entire rest of the year to do that.

Anyway, I’m not going to try and convince you that this is a superior dressing, or that you should change your regular routine, but if you’re someone who's looking for a change of pace dressing, that’s still very familiar and comforting, this could be the one.

Of course, you can use whatever ingredients you normally add to your bread dressing, and it should work just the same. By the way, I never stuff my turkey, so if you choose to use this as a stuffing, please refer to the roughly one million Thanksgiving turkey cooking guides linked online. Enjoy!


Ingredients for 16 portions:
1 pound saltine crackers (4 sleeves)
1/2 cup butter
1 large or 2 small yellow onions, diced
3 or 4 ribs of celery, diced
1 tsp salt, or to taste
1/2 tsp freshly ground black pepper
cayenne to taste
1/2 tsp dried sage
1/2 tsp dried thyme
1/2 tsp dried rosemary
2 3/4 cups chicken or turkey broth
1/2 cup cream or milk
1 or 2 eggs
*Tip: you can cook a small nugget in a pan and taste for seasoning
Bake at 375 degrees F. for bout 45 minutes