Cream of Cauliflower – Come for the Soup, Stay for the Bacon Gremolata

We’re heading into the heart of hot soup season, and this cream of cauliflower will ward off autumn’s chill with the best of them. I’m a big fan of the cauliflower in all forms, but this simple soup may be my favorite application.

Of course, human nature being what it is, I wasn’t satisfied with just the soup, and wanted to garnish with something new and exciting. Unfortunately, I couldn’t think of anything, so I decided to follow that age-old advice which says, “when in doubt, bacon.”

I’ve garnished soups like this with bacon before, but never tried toasting breadcrumbs in the rendered fat. Not surprisingly, it worked very well, and the additions of lemon zest and parsley elevated things even more. The only problem with a recipe like this is the next time I’m served a cream of cauliflower, no matter how good it is, I’m going to be a little sad there’s no bacon gremolata floating on top.

By the way, I realize there are no breadcrumbs in a true gremolata, but I thought it sounded kind of cool, and besides, I’ve never been that big on respecting the sanctity of culinary terms. I was going to go with “baconized breadcrumbs,” but that sounded a little too much like molecular gastronomy, which is much worse.

If you’re not into eating animals, some diced shiitake mushrooms and a pinch of smoked paprika would be a great substitute in the gremolata. You’d also need to add some olive oil to replace the rendered bacon fat, but you probably knew that.

Now that I think about it, that vegetarian version sounds pretty amazing as well. Maybe next time I’ll skip the bacon and…oh, who am I kidding? Anyway, I hope you give this delicious fall soup a try soon. Enjoy!


Ingredients for about 8 servings:
1 onion, chopped
1 rib celery, chopped
1 tbsp olive oil
3 cloves garlic
salt to taste
1 large russet potato, peeled, quartered
2 heads cauliflower, trimmed
1 quart chicken broth
1 quart water
1/2 cup cream
cayenne to taste
For the gremolata:
4 strips bacon
1 1/2 cups fresh breadcrumbs
1 tbsp lemon zest
2 tbsp chopped Italian parsley

View the complete recipe

Cream of Cauliflower – Come for the Soup, Stay for the Bacon Gremolata

We’re heading into the heart of hot soup season, and this cream of cauliflower will ward off autumn’s chill with the best of them. I’m a big fan of the cauliflower in all forms, but this simple soup may be my favorite application.

Of course, human nature being what it is, I wasn’t satisfied with just the soup, and wanted to garnish with something new and exciting. Unfortunately, I couldn’t think of anything, so I decided to follow that age-old advice which says, “when in doubt, bacon.”

I’ve garnished soups like this with bacon before, but never tried toasting breadcrumbs in the rendered fat. Not surprisingly, it worked very well, and the additions of lemon zest and parsley elevated things even more. The only problem with a recipe like this is the next time I’m served a cream of cauliflower, no matter how good it is, I’m going to be a little sad there’s no bacon gremolata floating on top.

By the way, I realize there are no breadcrumbs in a true gremolata, but I thought it sounded kind of cool, and besides, I’ve never been that big on respecting the sanctity of culinary terms. I was going to go with “baconized breadcrumbs,” but that sounded a little too much like molecular gastronomy, which is much worse.

If you’re not into eating animals, some diced shiitake mushrooms and a pinch of smoked paprika would be a great substitute in the gremolata. You’d also need to add some olive oil to replace the rendered bacon fat, but you probably knew that.

Now that I think about it, that vegetarian version sounds pretty amazing as well. Maybe next time I’ll skip the bacon and…oh, who am I kidding? Anyway, I hope you give this delicious fall soup a try soon. Enjoy!


Ingredients for about 8 servings:
1 onion, chopped
1 rib celery, chopped
1 tbsp olive oil
3 cloves garlic
salt to taste
1 large russet potato, peeled, quartered
2 heads cauliflower, trimmed
1 quart chicken broth
1 quart water
1/2 cup cream
cayenne to taste
For the gremolata:
4 strips bacon
1 1/2 cups fresh breadcrumbs
1 tbsp lemon zest
2 tbsp chopped Italian parsley

Tarte Tatin – See What the Others Aren’t Willing to Show You

When I looked at some other tarte tatin recipes on YouTube, I noticed that very few showed the “flip on to the plate” step. They would just skip from the out of the oven shot to the final beauty shot. The reason of course, is that very few tarte tatins come out of the hot pan perfectly, and if they showed that, then you may not think they are as awesome as their profile says they are.

So, it’s with much pride that I show you the whole ugly scene that is the tarte tatin dismount. The good news is, it’s very simple to slap everything back on the crust before it cools, and none will be the wiser. This is even easier if you’re doing a version with very soft and tender apples and lots of caramel, which is my preference, as you’ll see.

If you do a Google image search for a classic, old recipe like this, you usually see a lot of photos that look alike, but that’s not necessarily so with tarte tatin. You’ll see an amazingly diverse array, which is fascinating since they were all made with the same few basic ingredients. Most of this is a result of cooking time in the pan before baking.

Some feature firm, barely cooked apples, while others cook the fruit all the way down to a buttery, caramelized jam. The beauty of a recipe that uses just pastry dough, butter, apples and sugar to make the magic, is that no matter how yours comes out you’ll enjoy it. Of course, you’ll want to hedge your bets with some vanilla bean ice cream to be safe. I hope you give this classic French treat a try soon. Enjoy!


3 large apples, quartered
3 tbsp butter
3/4 cup sugar
pie dough for a single crust

Beef Short Ribs "Sauerbraten" – Oh, Snap!

I had heard that some sauerbratens were finished by thickening the sauce with ground gingersnaps, but had never tried it since it just sounds so wrong. It certainly doesn’t seem very German. Cookies in a sauce? What’s next, laughing in public?

Anyway, I’ve had a lot of “do something German!” food wishes lately, and since I’ve wanted to post another short ribs recipe, this seemed like the perfect opportunity to go full cookie. The results shocked and amazed me. This was comfort food at it's finest.

The 24-hour marinade ensured the succulent rib meat had that signature tanginess, and those little cookies not only gave the sauce a beautiful texture, but also added a great spicy sweetness. I am now officially in favor of using cookies to finish savory sauces.

With cooler weather on the way, it’s time to rediscover the simple joy of slowly stewed meat, and what better way than with this delicious take on a German classic? I hope you give it a try soon. Enjoy!


Ingredients:
For the marinade
3 lbs short ribs, seasoned with salt and pepper
1 tbsp vegetable oil
2/3 cup cider vinegar
2/3 cup red wine vinegar
1 1/2 cups water, plus 1 cup cold water at end to cool marinade down
2 bay leaves
9 whole cloves
12 juniper berries
1/2 teaspoon freshly ground black pepper
1 tablespoon salt
*Marinate at least 24 hours
Then stew with:
1 chopped large onion
1 chopped carrot
2 ribs celery, chopped
3 cloves garlic, minced
1 cup water
1 cup chicken or beef broth
2 tablespoons sugar, or to taste
1 tablespoon balsamic vinegar
1/2 cup crushed gingersnaps
salt and pepper to taste

View the complete recipe

Beef Short Ribs "Sauerbraten" – Oh, Snap!

I had heard that some sauerbratens were finished by thickening the sauce with ground gingersnaps, but had never tried it since it just sounds so wrong. It certainly doesn’t seem very German. Cookies in a sauce? What’s next, laughing in public?

Anyway, I’ve had a lot of “do something German!” food wishes lately, and since I’ve wanted to post another short ribs recipe, this seemed like the perfect opportunity to go full cookie. The results shocked and amazed me. This was comfort food at it's finest.

The 24-hour marinade ensured the succulent rib meat had that signature tanginess, and those little cookies not only gave the sauce a beautiful texture, but also added a great spicy sweetness. I am now officially in favor of using cookies to finish savory sauces.

With cooler weather on the way, it’s time to rediscover the simple joy of slowly stewed meat, and what better way than with this delicious take on a German classic? I hope you give it a try soon. Enjoy!


Ingredients:
For the marinade
3 lbs short ribs, seasoned with salt and pepper
1 tbsp vegetable oil
2/3 cup cider vinegar
2/3 cup red wine vinegar
1 1/2 cups water, plus 1 cup cold water at end to cool marinade down
2 bay leaves
9 whole cloves
12 juniper berries
1/2 teaspoon freshly ground black pepper
1 tablespoon salt
*Marinate at least 24 hours
Then stew with:
1 chopped large onion
1 chopped carrot
2 ribs celery, chopped
3 cloves garlic, minced
1 cup water
1 cup chicken or beef broth
2 tablespoons sugar, or to taste
1 tablespoon balsamic vinegar
1/2 cup crushed gingersnaps
salt and pepper to taste

Lambage Rolls! Lamb & Rice Stuffed Cabbage Leaves with Almonds and Currants

My love of cabbage rolls is deep and unconditional. I almost always make the same version, based on my Aunt Angela’s famous recipe, but once in a while, just for the hell of it, I’ll use lamb instead of beef. 

I love lamb burgers and lamb meatballs, so it’s no surprise that I love lamb-stuffed cabbage rolls, and I’m happy to report that these particular “lambage” rolls were the best non-beef version yet!

I remembered a middle-eastern restaurant Michele and I used to frequent, which served a lamb meatball stewed with tomatoes and spices, and served over a rice pilaf studded with almonds and currants. I really loved that dish and tried to incorporate those elements into these cabbage rolls.

I loved the results. Big, bold flavors, yet not too heavy, and like all cabbage rolls, these were very, very comforting. I used a pretty lean grind for the lamb, but ideally the butcher will give you something close to a 80/20 lean-to-fat ratio.

As far as the rest of the stuff, you’re on your own, and as usual I’ll ignore most of the “can I leave out the [insert delicious, totally necessary ingredient here]” questions. You are the boss of your cabbage rolls, so act like it. Anyway, I hope you share my love of cabbage rolls, and if you do, I really hope you give this version a try. Enjoy!


Makes 8 Lambage Rolls
1 lb ground lamb
1 cup rice
1/4 cup butter
2 tbsp olive oil
1/2 onion, diced
4 cloves garlic, crushed
2 tsp salt
1 tsp black pepper
1 tsp cumin
1/2 tsp cinnamon
1/4 tsp cayenne
pinch dried oregano
1/4 cup packed Italian parsley
1 tbsp dried currants
2 tbsp sliced almonds
1 cup tomato puree
3 1/2 cups chicken broth
1/2 onion sliced
1 head cabbage
salt and pepper to taste
feta and parsley to garnish, optional

View the complete recipe

Lambage Rolls! Lamb & Rice Stuffed Cabbage Leaves with Almonds and Currants

My love of cabbage rolls is deep and unconditional. I almost always make the same version, based on my Aunt Angela’s famous recipe, but once in a while, just for the hell of it, I’ll use lamb instead of beef. 

I love lamb burgers and lamb meatballs, so it’s no surprise that I love lamb-stuffed cabbage rolls, and I’m happy to report that these particular “lambage” rolls were the best non-beef version yet!

I remembered a middle-eastern restaurant Michele and I used to frequent, which served a lamb meatball stewed with tomatoes and spices, and served over a rice pilaf studded with almonds and currants. I really loved that dish and tried to incorporate those elements into these cabbage rolls.

I loved the results. Big, bold flavors, yet not too heavy, and like all cabbage rolls, these were very, very comforting. I used a pretty lean grind for the lamb, but ideally the butcher will give you something close to a 80/20 lean-to-fat ratio.

As far as the rest of the stuff, you’re on your own, and as usual I’ll ignore most of the “can I leave out the [insert delicious, totally necessary ingredient here]” questions. You are the boss of your cabbage rolls, so act like it. Anyway, I hope you share my love of cabbage rolls, and if you do, I really hope you give this version a try. Enjoy!


Makes 8 Lambage Rolls
1 lb ground lamb
1 cup rice
1/4 cup butter
2 tbsp olive oil
1/2 onion, diced
4 cloves garlic, crushed
2 tsp salt
1 tsp black pepper
1 tsp cumin
1/2 tsp cinnamon
1/4 tsp cayenne
pinch dried oregano
1/4 cup packed Italian parsley
1 tbsp dried currants
2 tbsp sliced almonds
1 cup tomato puree
3 1/2 cups chicken broth
1/2 onion sliced
1 head cabbage
salt and pepper to taste
feta and parsley to garnish, optional

Crab-Stuffed Corn Muffins – Just One Frosting Away From Being Cupcakes

I was originally going to call these “crab and corn cupcakes,” but since I’ve still not perfected my bacon frosting recipe, I decided to hold off and go with the slightly less exciting sounding “crab-stuffed corn muffins.” And no, I’m not kidding about the bacon frosting.

Besides, since these were inspired by the food wish for new, easy and interesting football party snacks, I think “muffins” sounds a little more gridiron than cupcakes. Regardless, they were simple to make, and (as I tested personally) quite delicious eaten while watching a football game, possibly with beer(s).

As some of you longtime viewers may have noticed, this is a variation on something we posted many years ago called “Kernel Porker's Barbecued Pork-Stuffed Corn Muffins,” and I always wondered how it would be with crabmeat. When I got the usual autumn avalanche of football-themed food wishes, I figured the time was right to find out, and I was very happy with the results!

As I mention in the video, they reminded me of a New England crab or lobster roll, where they simply pile warm, buttery seafood on those toasted rolls. This was heavier, but just as pleasurable. Anyway, unlike the replacement referees that are now calling the games, these didn’t suck, and certainly won’t be a season-long embarrassment to the league. I hope you give them a try soon. Enjoy!


Ingredients for 12 Crab-stuffed Corn Muffins
For the crab filling:
8 oz crabmeat
1 1/2 tbsp mayo
1 tsp crushed red chili sauce
1/4 tsp Worcestershire sauce
1 tsp fresh grated lemon zest
2 oz grated pepper Jack cheese (about 1/2 cup)
salt to taste
For the corn muffins:
1 cup all-purpose flour
1 cup corn meal
1/2 tsp salt
1/2 tsp baking soda
1 tbsp minced green onions
2 eggs
1 cup buttermilk
1/2 cup melted butter
Bake at 375 degrees F. for 25-30 minutes. Serve warm.

View the complete recipe

Crab-Stuffed Corn Muffins – Just One Frosting Away From Being Cupcakes

I was originally going to call these “crab and corn cupcakes,” but since I’ve still not perfected my bacon frosting recipe, I decided to hold off and go with the slightly less exciting sounding “crab-stuffed corn muffins.” And no, I’m not kidding about the bacon frosting.

Besides, since these were inspired by the food wish for new, easy and interesting football party snacks, I think “muffins” sounds a little more gridiron than cupcakes. Regardless, they were simple to make, and (as I tested personally) quite delicious eaten while watching a football game, possibly with beer(s).

As some of you longtime viewers may have noticed, this is a variation on something we posted many years ago called “Kernel Porker's Barbecued Pork-Stuffed Corn Muffins,” and I always wondered how it would be with crabmeat. When I got the usual autumn avalanche of football-themed food wishes, I figured the time was right to find out, and I was very happy with the results!

As I mention in the video, they reminded me of a New England crab or lobster roll, where they simply pile warm, buttery seafood on those toasted rolls. This was heavier, but just as pleasurable. Anyway, unlike the replacement referees that are now calling the games, these didn’t suck, and certainly won’t be a season-long embarrassment to the league. I hope you give them a try soon. Enjoy!


Ingredients for 12 Crab-stuffed Corn Muffins
For the crab filling:
8 oz crabmeat
1 1/2 tbsp mayo
1 tsp crushed red chili sauce
1/4 tsp Worcestershire sauce
1 tsp fresh grated lemon zest
2 oz grated pepper Jack cheese (about 1/2 cup)
salt to taste
For the corn muffins:
1 cup all-purpose flour
1 cup corn meal
1/2 tsp salt
1/2 tsp baking soda
1 tbsp minced green onions
2 eggs
1 cup buttermilk
1/2 cup melted butter
Bake at 375 degrees F. for 25-30 minutes. Serve warm.

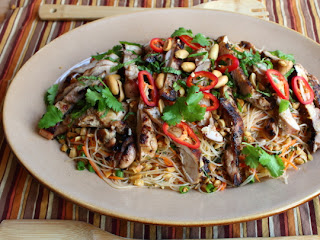
Spicy Rice Noodle Salad – Strange But Chew

The first time I had a spicy, cold rice noodle salad, it wasn’t the bold flavors that caught me by surprise, but the strange and addictive texture. It was so different to any pasta salad I’d ever had before, that I was kind of bummed I hadn’t known about this stuff sooner. Makes me sad to think about all the time back I wasted on those stupid, tri-color fusilli salads.

Anyway, this is pretty easy and delicious stuff. I’m not even sure these noodles are technically cooked, but simply softened in very hot water to your personal preference of tenderness. You can, and many do, boil this stuff like pasta for a couple minutes, and have what’s much closer to a proper al dente angel hair, but I much prefer the toothsomeness you get using the hot water method. 

Unlike undercooked wheat flour pastas, this isn’t a gummy, crunch, but much more of a “pop” or “snap” as your teeth break through the almost tender noodles. Once soaked with the vibrant dressing, and topped with the optional, but highly recommended grilled chicken, you have a change-of-pace lunch that will be the talk of the water cooler.

Speaking of the chicken, all you’ll need to do is double the dressing recipe, and pour half over some boneless skinless chicken thighs (or any other cut). Let sit out, marinating for 30 minutes, and then grill to caramelized perfection. I hope you give this great spicy rice noodle salad a try soon. Enjoy!

>

Ingredients for 2 large servings:
1 package (6.25 oz) thin rice noodle (soaked in almost boiling water until desired tenderness, rinsed, drained thoroughly)
3 garlic cloves, crushed
1/3 cup seasoned rice vinegar
1 or 2 tbsp samal or other ground chili sauce
3 tbsp fish sauce
1 tsp brown sugar
1/4 tsp salt
1 cup carrot julienne
4 green onions, chopped
1/2 cup packed mixture of chopped basil, mint, and cilantro
1/2 cup chopped peanuts
1 tsp sesame oil
Optional:
6 grilled boneless skinless chicken thighs
sliced Fresno chilies

View the complete recipe

Spicy Rice Noodle Salad – Strange But Chew

The first time I had a spicy, cold rice noodle salad, it wasn’t the bold flavors that caught me by surprise, but the strange and addictive texture. It was so different to any pasta salad I’d ever had before, that I was kind of bummed I hadn’t known about this stuff sooner. Makes me sad to think about all the time back I wasted on those stupid, tri-color fusilli salads.

Anyway, this is pretty easy and delicious stuff. I’m not even sure these noodles are technically cooked, but simply softened in very hot water to your personal preference of tenderness. You can, and many do, boil this stuff like pasta for a couple minutes, and have what’s much closer to a proper al dente angel hair, but I much prefer the toothsomeness you get using the hot water method. 

Unlike undercooked wheat flour pastas, this isn’t a gummy, crunch, but much more of a “pop” or “snap” as your teeth break through the almost tender noodles. Once soaked with the vibrant dressing, and topped with the optional, but highly recommended grilled chicken, you have a change-of-pace lunch that will be the talk of the water cooler.

Speaking of the chicken, all you’ll need to do is double the dressing recipe, and pour half over some boneless skinless chicken thighs (or any other cut). Let sit out, marinating for 30 minutes, and then grill to caramelized perfection. I hope you give this great spicy rice noodle salad a try soon. Enjoy!

>

Ingredients for 2 large servings:
1 package (6.25 oz) thin rice noodle (soaked in almost boiling water until desired tenderness, rinsed, drained thoroughly)
3 garlic cloves, crushed
1/3 cup seasoned rice vinegar
1 or 2 tbsp samal or other ground chili sauce
3 tbsp fish sauce
1 tsp brown sugar
1/4 tsp salt
1 cup carrot julienne
4 green onions, chopped
1/2 cup packed mixture of chopped basil, mint, and cilantro
1/2 cup chopped peanuts
1 tsp sesame oil
Optional:
6 grilled boneless skinless chicken thighs
sliced Fresno chilies

Ham with Red Eye Gravy – Something From Nothing is Something

In this age of cutting back on fat whenever and wherever we can (and by “we” I mean “you”), we forget that throughout most of history, this was the complete opposite. Fat was a concentrated, powerful fuel that literally kept people going, and this red eye gravy is a little taste of those times.

The challenge in tough times is to make those greasy pan drippings more palatable, more interesting, and more delicious. It’s not like families struggling through the depression had pots of demiglace reducing on the stove, or bottles of Cabernet Sauvignon sitting around to deglaze their cast iron skillets – heck, they probably didn’t even have a decent Merlot. So they used what they had; like a splash of leftover coffee.

Is this a recipe that would have been developed based solely on how awesome it tastes? Probably not, but that’s not to say it isn’t still very tasty. It is. The way the bitter coffee marries with the sweet, smoky fat is far from unpleasant, and infinitely better than simply pouring the pan drippings over your food.

By the way, the name apparently comes from the fact that when the sauce is poured in a bowl and brought to the table, the fat and coffee separate, it takes on the appearance of a big, reddish eye. Of course there’s another legend about how General Andrew Jackson told a hung-over cook to make a gravy for his ham that was as red as his bloodshot eyes.

I’m pretty sure whoever made up that story also had very red eyes, but not from whiskey. Anyway, like I said in the video, I did this as more of a culinary experiment than a “you have to try this” recipe, but regardless, I think it’s an interesting dish, and one I’d be interested in hearing about if you do try. Enjoy!


Ingredients for 2 portions:
1/2 cup of chopped fatty ham scraps
1 tbsp vegetable oil
4 thick slices of ham
1 tsp flour
about 2/3 cup black coffee
black pepper and cayenne to taste

View the complete recipe

Ham with Red Eye Gravy – Something From Nothing is Something

In this age of cutting back on fat whenever and wherever we can (and by “we” I mean “you”), we forget that throughout most of history, this was the complete opposite. Fat was a concentrated, powerful fuel that literally kept people going, and this red eye gravy is a little taste of those times.

The challenge in tough times is to make those greasy pan drippings more palatable, more interesting, and more delicious. It’s not like families struggling through the depression had pots of demiglace reducing on the stove, or bottles of Cabernet Sauvignon sitting around to deglaze their cast iron skillets – heck, they probably didn’t even have a decent Merlot. So they used what they had; like a splash of leftover coffee.

Is this a recipe that would have been developed based solely on how awesome it tastes? Probably not, but that’s not to say it isn’t still very tasty. It is. The way the bitter coffee marries with the sweet, smoky fat is far from unpleasant, and infinitely better than simply pouring the pan drippings over your food.

By the way, the name apparently comes from the fact that when the sauce is poured in a bowl and brought to the table, the fat and coffee separate, it takes on the appearance of a big, reddish eye. Of course there’s another legend about how General Andrew Jackson told a hung-over cook to make a gravy for his ham that was as red as his bloodshot eyes.

I’m pretty sure whoever made up that story also had very red eyes, but not from whiskey. Anyway, like I said in the video, I did this as more of a culinary experiment than a “you have to try this” recipe, but regardless, I think it’s an interesting dish, and one I’d be interested in hearing about if you do try. Enjoy!


Ingredients for 2 portions:
1/2 cup of chopped fatty ham scraps
1 tbsp vegetable oil
4 thick slices of ham
1 tsp flour
about 2/3 cup black coffee
black pepper and cayenne to taste

What I’m Having for Dinner: Roast Pork Loin

My stay with family in Western New York is quickly coming to an end, and I’ll be traveling back to San Francisco on Friday. I do have one more new video recipe to post before I go, and as a little tease, I’ll say it will certainly be a controversial one.

In the meantime, I thought I’d repost this brined roast pork loin recipe, since this is what I’m making for dinner tonight. I’m sure I’ll tweak it somehow, I always do, but I’ll use the same basic technique seen herein. To read the original post, and get the ingredients, follow this link. Enjoy!

Beef Borscht – You Really Can’t Beat This Beet Soup

This delicious and vividly colored beef borscht is the first soup I can ever remember eating. Every summer, we’d drive to New York City to visit my father’s side of the family. His father was Ukrainian, and his mother was Polish, and like the pierogis they’d have ready for us, this beef and beet soup was always a very welcomed part of the trip.

It was also this soup that started my lifelong love of adding sour cream to things. The way the tangy, rich cream melted into the hot, beefy broth was a wonder to behold, and unlike any other soup I’d eat the rest of the year. Speaking of beefy broth, I only used one measly piece of shank, but you are welcome to add one or two more to make this even more awesome.

Of course, there are a thousand versions of borscht, and as usual I have no idea how authentic this is, which is fine since, well, it’s soup for God’s sake. Beside what vegetables to add or delete, there is also the question of temperature.

Word on the street is that the Ukrainian/Russian versions are served piping hot, and that the Polish versions are served chilled. However, there does seem to be a general agreement as far as beverage pairings go. I’ll let one of my YouTube followers, Afterapplepicking, explain:

“Hot, beefy, red, Russian borscht is only to be served with copious amounts of beer or vodka. Which is quite a distinction from the cold, vegetarian, pink Polish borscht, which is only to be served with copious amounts of beer or vodka.”

Well said! Anyway, I hope you give this blast from my soupy past a try soon, and as always, enjoy!


Ingredients (amounts not critical!)
2-3 quarts of beef broth
(to make your own: simmer a well-browned beef shank or two in 3 quarts of water for 4 hours, or until the meat is falling off the bone, and completely flavorless)
1 bay leaf
1 cup chopped carrots
1/2 cup chopped celery
1 onion, chopped
3 cups sliced beets
2 cups chopped cabbage
salt and pepper to taste
1/4 cup white vinegar, or to taste
sour cream and dill or chive to garnish
*This soup doesn't require a lot of thought. Simply simmer everything until tender!

View the complete recipe

Beef Borscht – You Really Can’t Beat This Beet Soup

This delicious and vividly colored beef borscht is the first soup I can ever remember eating. Every summer, we’d drive to New York City to visit my father’s side of the family. His father was Ukrainian, and his mother was Polish, and like the pierogis they’d have ready for us, this beef and beet soup was always a very welcomed part of the trip.

It was also this soup that started my lifelong love of adding sour cream to things. The way the tangy, rich cream melted into the hot, beefy broth was a wonder to behold, and unlike any other soup I’d eat the rest of the year. Speaking of beefy broth, I only used one measly piece of shank, but you are welcome to add one or two more to make this even more awesome.

Of course, there are a thousand versions of borscht, and as usual I have no idea how authentic this is, which is fine since, well, it’s soup for God’s sake. Beside what vegetables to add or delete, there is also the question of temperature.

Word on the street is that the Ukrainian/Russian versions are served piping hot, and that the Polish versions are served chilled. However, there does seem to be a general agreement as far as beverage pairings go. I’ll let one of my YouTube followers, Afterapplepicking, explain:

“Hot, beefy, red, Russian borscht is only to be served with copious amounts of beer or vodka. Which is quite a distinction from the cold, vegetarian, pink Polish borscht, which is only to be served with copious amounts of beer or vodka.”

Well said! Anyway, I hope you give this blast from my soupy past a try soon, and as always, enjoy!


Ingredients (amounts not critical!)
2-3 quarts of beef broth
(to make your own: simmer a well-browned beef shank or two in 3 quarts of water for 4 hours, or until the meat is falling off the bone, and completely flavorless)
1 bay leaf
1 cup chopped carrots
1/2 cup chopped celery
1 onion, chopped
3 cups sliced beets
2 cups chopped cabbage
salt and pepper to taste
1/4 cup white vinegar, or to taste
sour cream and dill or chive to garnish
*This soup doesn't require a lot of thought. Simply simmer everything until tender!